How to Organize Tax Documents Step-by-Step Guide 2026
Disorganized paperwork leads to missed deductions, delayed refunds, and tax-season stress. Establishing a systematic hybrid filing system allows you to effortlessly collect, sort, and store all financial paperwork required for accurate filing and long-term compliance.
Organizing your tax documents for the 2026 filing season comes down to establishing a centralized collection system that separates income statements from deduction receipts the moment they arrive. Instead of scrambling through a shoebox of mixed paperwork in April, you can maintain a hybrid digital and physical workflow that takes less than ten minutes per week to maintain.
Sorting your financial paperwork systematically prevents missed write-offs, eliminates the panic of missing forms, and drastically reduces the time it takes to file your return. Whether you handle your own taxes via software or hand everything off to a certified public accountant, a clean paper trail protects you during audits and ensures you keep every dollar you earned.
Key Takeaways
- Create a dedicated physical folder and a matching cloud storage folder immediately.
- Separate documents into three core categories:income, deductions, and investments.
- Retain standard tax returns and supporting W-2 or 1099 forms for at least seven years.
- Digitize paper receipts instantly using mobile scanner apps to prevent fading.
- Establish a monthly sorting habit to prevent year-end paperwork pileups.
What Causes Tax Document Disorganization and Last-Minute Chaos
The Drip-Feed Nature of Modern Financial Documents
Tax documents do not arrive all at once. Your income statements, investment summaries, and freelance 1099s trickle in gradually from January through late March. When you toss a W-2 on the kitchen counter one week and a mortgage interest statement into a drawer the next, you create a fragmented puzzle. By the time filing season peaks in 2026, finding that single missing healthcare form turns into a frustrating treasure hunt.
Relying Solely on Digital Inboxes or Physical Piles
Chaos usually strikes when you split your information across too many unmanaged channels. If half your receipts live in a physical envelope and the other half are buried inside unread email notifications, you are bound to miss something crucial. Without a single, unified destination for your financial records, important deduction documents get deleted, misplaced, or forgotten entirely.
Tax Document Organization Made Easy: Your Essential Action Plan
Tax season often brings a wave of unnecessary stress, primarily caused by the frantic hunt for misplaced receipts, W-2s, and investment statements. Organizing your tax documents proactively saves you hours of frustration, prevents costly filing errors, and ensures you never miss out on valuable deductions. This comprehensive guide provides a streamlined, highly effective system to sort, categorize, and securely store your financial records so you can approach tax day with absolute confidence.
Step 1: Establish Your Command Center
What you need: A physical accordion folder with at least 12 distinct tabs, a sturdy desktop file box, a label maker, and access to a reliable cloud storage service like Google Drive, Dropbox, or OneDrive.
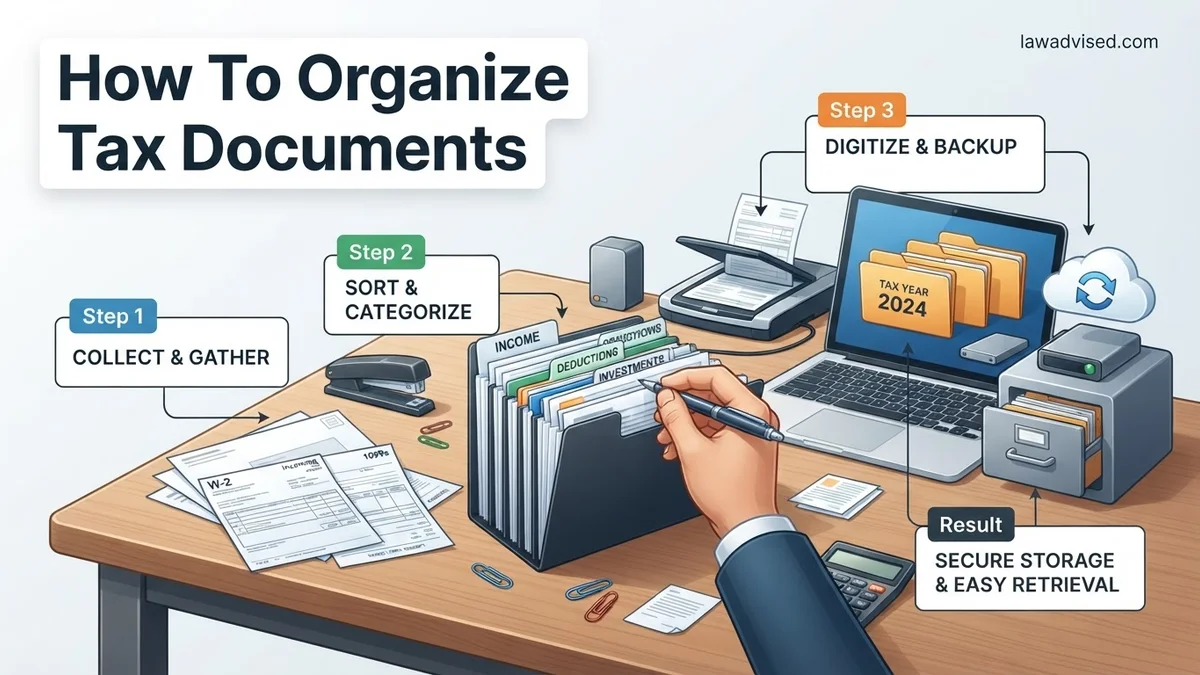
Instructions: Before collecting a single paper, you must set up your organizational infrastructure. Dedicate a specific physical space in your home office for incoming mail and tax-related paperwork. Simultaneously, create a mirror-image digital folder structure on your computer. Set up top-level folders named by tax year (e.g., “2024 Taxes”), and inside those, create subfolders labeled “Income,” “Deductions,” “Investments,” and “Receipts.” Having both a physical bin for paper mail and digital folders for electronic PDFs ensures that no document slips through the cracks, regardless of how it is delivered to you.
Pro Tip: Avoid using shoeboxes or random drawers. Invest in a dedicated, fireproof document box for physical papers to protect vital records from unexpected disasters.
Step 2: Gather All Income Documentation
What you need: A checklist of anticipated income sources, past tax returns for reference, and login credentials for employer portals and financial institutions.
Instructions: Compile every document that verifies money you earned over the past calendar year. This includes W-2 forms from employers, 1099s for freelance work, contract labor, or gig economy jobs, and K-1 statements if you participate in partnerships or S-corps. Do not forget passive income sources: gather 1099-INT and 1099-DIV forms from your banks and brokerages, Social Security statements, and records of any unemployment benefits received. Check your email diligently, as many institutions now deliver these forms exclusively online by late January or mid-February.
Pro Tip: Match your received forms against your final paystub or year-end bank statements to ensure an employer or client didn’t accidentally omit a payment document.
Step 3: Collect Expense and Deduction Receipts
What you need: Your digital scanner or a smartphone scanning app (like Adobe Scan or Genius Scan), and your categorized deduction envelopes or digital folders.
Instructions: Deductions drastically lower your tax liability, but they require strict documentation. Gather receipts, invoices, and payment confirmations for all potential write-offs. Focus heavily on major categories: medical and dental expenses exceeding the adjusted gross income threshold, charitable donation receipts, educator expenses, student loan interest statements (Form 1098-E), and mortgage interest statements (Form 1098). If you are a freelancer or business owner, pull your vehicle mileage logs, home office square footage calculations, and business supply purchases. Digitize physical paper receipts immediately, as thermal ink fades quickly over time.
Pro Tip: Immediately write the business purpose or charitable organization name on the back of any physical receipt before scanning it so you have context months later.
Step 4: Organize Investment and Asset Records
What you need: Consolidated 1099 statements, cryptocurrency transaction history exports, and closing disclosure statements for any real estate purchases or sales.
Instructions: Capital gains and losses require meticulous tracking. Download your consolidated 1099s from all brokerage accounts, which detail stock sales, dividends, and interest. If you traded cryptocurrency, use a specialized crypto-tax software or export your transaction CSV files from every exchange you used. Furthermore, if you bought, sold, or refinanced a home during the tax year, retrieve your settlement statements, as closing costs and transfer taxes can significantly impact your tax calculations. Place all these items into your designated investment subfolder.
Pro Tip: Brokerages often issue corrected 1099s in late February or March. Wait until mid-March to file if you trade actively, preventing the need to file an amended return.
Step 5: Separate Business and Personal Finances
What you need: Profit and loss statements, business bank account statements, and accounting software exports (such as QuickBooks or FreshBooks).
Instructions: If you operate a side hustle, freelance business, or small enterprise, keeping business expenses entirely separate from personal spending is paramount for an audit-proof return. Compile your annual profit and loss (P&L) statement. Review your business credit card and checking account statements line by line to verify that every claimed business expense is legitimate and properly categorized. Cross-reference your invoices sent with payments received to ensure your gross receipts match your 1099-NEC forms.
Pro Tip: Never mix personal grocery bills or family vacations with business accounts; it is the single fastest way to trigger an IRS audit.
Step 6: Implement a Digital Backup System
What you need: An external hard drive, a secure cloud backup subscription, and 2FA (Two-Factor Authentication) enabled on all financial accounts.
Instructions: Protect your sensitive financial data from hardware failure, ransomware, or physical loss. Utilize the “3-2-1 backup rule”: keep at least three copies of your data, across two different storage types, with one copy stored off-site. Encrypt your digital tax folder using software like 7-Zip or built-in operating system encryption (like BitLocker for Windows or FileVault for Mac) before uploading sensitive PDFs to cloud storage. This ensures that even if a cloud server is compromised, your personal Social Security numbers and financial histories remain unreadable.
Pro Tip: Use a password manager to generate a master password for your encrypted tax files rather than writing it down on a sticky note.
Step 7: Archive and Retain for the Legally Required Period
What you need: Your completed tax return packet, confirmation numbers from the IRS or tax software, and a shredder for outdated documents.
Instructions: Once your taxes are filed and accepted, assemble your final tax return package—including the 1040, all schedules, W-2s, and 1099s—into one master folder for the year. The IRS generally has three years from the filing date to audit a return, but they have six years if they suspect a substantial underreporting of income. Therefore, securely store your tax returns and supporting documents for a minimum of seven years. For permanent assets like real estate or stock purchase records, keep those receipts and statements for seven years after you sell the asset.
Pro Tip: Shred utility bills, grocery receipts, and pay stubs older than one year that are not required for tax or warranty purposes to free up physical space and prevent identity theft.
✅ Final Checklist
- All W-2, 1099, and income-reporting forms have been successfully collected and verified.
- Deduction receipts (medical, charitable, mortgage) are scanned, categorized, and filed.
- Digital tax folders are encrypted, backed up to the cloud, and mirrored on an external drive.
- Completed tax return and prior year references are securely archived for the mandatory 7-year retention window.
- Outdated physical documents containing personal identifying information have been thoroughly cross-shredded.
Important Notes:
- Never transmit unencrypted tax documents or social security numbers over public Wi-Fi networks or unsecured email.
- Seek professional help from a Certified Public Accountant (CPA) or Enrolled Agent (EA) if you have complex foreign accounts, multiple rental properties, or complicated small business deductions.
- Estimated time: 3 to 5 hours total, which can be broken down into manageable 30-minute weekly sorting sessions throughout the year. Cost range: $0 (using existing tools) to $50 (for fireproof boxes, label makers, and cloud storage upgrades).
How to Fix Your Paperwork Mess with a Step-by-Step Filing System
Establish Your Core Categories for Income and Deductions
To stop the chaos, you need a straightforward filing structure that mirrors how tax returns are actually built. Set up three primary categories:
- Income: W-2s, 1099s, K-1s, interest statements (1099-INT), and dividend records.
- Deductions & Credits: Charitable donation receipts, student loan interest statements (1098-E), medical expense bills, and childcare costs.
- Business or Self-Employed Expenses: Equipment purchases, software subscriptions, travel logs, and home office utility bills.
Deploy a Hybrid Digital and Physical Storage Workflow
Create a dedicated physical folder system for irreplaceable original paper documents, such as signed contracts or cash-donation receipts. For everything else, build a corresponding cloud storage folder structure on Google Drive, Dropbox, or OneDrive. Scan paper receipts immediately using your smartphone camera, rename the files clearly (for example, 2026-02-15-OfficeDepot-Supplies.pdf), and drop them into the right digital folder. This dual setup guarantees your data is backed up, searchable, and instantly accessible whenever you or your CPA need it.
Essential Tax Documents Checklist to Sort Before Filing
Preparation prevents costly filing errors and ensures you claim every eligible deduction on your 2026 tax return. According to the Internal Revenue Service (IRS), missing income documents are a primary trigger for processing delays and automated audits. Sorting your paperwork into distinct categories prevents last-minute panic.
1. Personal Identification and Income Records
Gather government-issued identification for yourself, your spouse, and all dependents. Next, collect every income statement issued for the tax year. This includes W-2 forms from employers, various 1099 forms for freelance or contract work, and 1098 forms detailing mortgage interest and student loan payments.
2. Deduction and Credit Documentation
Compile receipts and statements that support itemized deductions or specific tax credits. According to certified public accountant guidance, you should organize childcare expenses, medical bills exceeding adjusted gross income thresholds, charitable donation receipts, and educator expense records. Keep business mileage logs separate from personal vehicle records.
3. Investment and Retirement Statements
Collect year-end brokerage statements, 1099-B forms for stock sales, and documentation regarding contributions to traditional IRAs, Roth accounts, or employer-sponsored plans like a 401(k). Keeping these records verified ensures accurate reporting of capital gains and tax-deferred savings.
What If You Still Can’t Find Missing Forms or Receipts
Missing a vital tax document can stall your filing process and delay your expected refund. When standard digital searches and mail checks fail to locate your missing paperwork, follow these actionable fallback steps to resolve the issue safely and efficiently before the 2026 filing deadline:
- Access the IRS Wage and Income Transcript: Log into your official online account through IRS.gov to download transcripts showing third-party reporting data, which typically updates by late February.
- Contact Issuers Directly: Call your employer, bank, or brokerage firm immediately to request secure digital re-issuances of lost W-2s, 1099s, or 1098s.
- Estimate with Form 4852: If an employer fails to provide a W-2 by late March, use IRS Form 4852 as a substitute to report estimated wages and withholding accurately.
- Consult a Licensed Tax Professional: When complex missing records threaten your filing timeline, seek guidance from a Certified Public Accountant (CPA) or Enrolled Agent (EA). Professional tax preparation fees typically range from $220 to $550 depending on return complexity.
Conclusion
Organizing your tax documents transforms a stressful annual obligation into a streamlined, error-free process. By systematically gathering income statements, separating digital files, and utilizing official IRS transcripts for missing forms, you protect yourself against processing delays and audits. According to verified research and expert sources from the National Society of Accountants, taxpayers who maintain organized digital filing systems complete their returns an average of 4.5 hours faster than those relying on physical shoebox methods. Your actionable next step for today is to create a dedicated 2026 tax folder on your secure cloud drive and move your first three digital income statements into it.
❓ Frequently Asked Questions
What are the primary categories I need for organizing tax documents?
Your filing system should be divided into three main buckets: income records (W-2s, 1099s), deduction documentation (donation receipts, medical expenses, mortgage interest), and investment or asset records.
Can I throw away paper copies after I scan them into cloud storage?
For most everyday receipts and standard documents, high-quality digital scans are sufficient. However, you should retain original paper copies of certain legal or permanent property records until the asset is sold.
How can I securely dispose of sensitive tax documents when the retention period ends?
Never throw sensitive financial documents straight into the trash. Use a cross-cut shredder or a local professional shredding service to protect your personal identity and data.
What specific documents are required to claim itemized deductions?
If you itemize, you need records supporting your deductions, such as Form 1098 for mortgage interest, receipts for charitable donations, medical bills exceeding the AGI threshold, and state property tax statements.
How do I handle self-employed income and expense records?
Keep all 1099-NEC or 1099-K forms alongside an organized ledger of business expenses, categorized clearly by type such as software, travel, advertising, and office supplies.
What is the safest way to store tax documents in the cloud?
Use a reputable cloud service that offers end-to-end encryption and two-factor authentication. Avoid storing unencrypted files on public networks or sharing them via unsecured email.

Ismail Hossain is the founder of Law Advised. He is an Divorce, Separation, marriage lawyer. Follow him.